Jump to content
  • Welcome to 205GTIDrivers.com!

    Hello dear visitor! Feel free to browse but we invite you to register completely free of charge in order to enjoy the full functionality of the website.

Sign in to follow this  
Kane

[Car_Overhaul] One Thing Leads To Another..

Recommended Posts

Kane

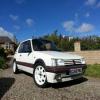
After a little trip in a mates 2.0 turbo 205 last year I thought it was time to look to get rid of the old mini clubman I had for a more modern (yet still classic) car with a bit more grunt. After scanning through the bay for a few weeks I came across a '89 1.9 Gti that was off the road, I contacted the seller and after a quick trip down road for a nosey I was soon the proud owner of my first 205.


Here's a picture after a quick wash:


car_zps8bf07591.jpg


I got the car up the road but it was running like a bag of s**t. I thought it would be a good idea to send it to a garage for an MOT and see what they came back with. A few hundred quid later it had passed but was running even worse after the mechanics had altered the mixture for the emissions, and I was also told that it had boiled over while up on the ramps at the garage.


Got it home checked the hoses to find masses of mayo everywhere, decided to whip the head off to have a look and confirmed a HG failure. So stripped the head down sent it off to be skimmed, new gaskets etc etc. Built back up but unfortunately stupid here made the disastrous mistake of misplacing the extra large head bolt spacer and voila a lovely big hole in the block :(​


I had originally planned to go down the 16v route but I would have liked to have driven the car for more than 30 seconds before doing so. But since the opportunity presented itself I had a look online and managed to find an mi with all ancillaries which had come from a 205.


I got the engine back up the road and set about stripping it down for a full rebuild. From the looks of it the head had had some previous valve failure which had also damaged two of the pistons.


valvedamage_zps98ecca3e.jpg


damagedpiston_zpsa16a1872.jpg


I decided to look for a replacement head and set of pistons due to the damage and managed to pick some up for a good price from a forum member on here.


  • Like 1

Share this post


Link to post
Share on other sites
Kane

At the moment the majority of the engine is away at Gardias Engine Services to get various bits and pieces done including:

  • 3 angle seat
  • back cut valves
  • block decked (4thou)
  • bottom end balanced
  • etc etc

So since the parts have been away I have been cleaning and refreshing bits and pieces of the car. I firstly had a crack at using plasticare to freshen up my terribly light grey bumpers. I'm sure everyone has seen the results of using this product on tired bumpers but just for reference here are some pics for you.


Sideplasticare_zpsde7619db.jpg


Trimbackon_zps9411f3a0.jpg


I decided to go with black plasticare instead of grey as I think the black looks better on a white car (oh and I still have to go over everything with a little thinners to nip up all the bits where I have run over onto the paint).


Further inspection of the car has uncovered a few more issues. Under the rear seats I found a few rust patches that have began to form which let me to poking about with a screwdriver and unfortunately a small hole has formed. This has led me to drop the tank for a closer inspection and by the looks of it there is a fair amount of surface rust and a couple of holes that will need seeing to. Also while everything is apart I will be looking to replace all brake lines and fuel lines as they are rusting slightly also.


Cue the hasty ebay purchase of a mig welder and some zintec sheet.. looks like I am going to try learn to weld..


As for the bay, I had originally set about the rust patches with a steel brush drill bit some jenolite and a few cans of aerosol but after a few weeks the rust was already starting to show so strip down, this time everything off.


strippedbay_zps1b5f0ed5.jpg


I've still to remove some things (loom, brake lines etc etc) before I undertake the full de-rust task. This time I've got a plan to use the wire wheel, some bilthamber rust removal products and I have just ordered some jotamastic 87 boat primer. Hopefully this will do the job.

Share this post


Link to post
Share on other sites
NFS

Hi, Looks lush really like the white, shame about the engine, im in the same
situation as you, i only drove my for 2 minutes before putting in my unit for
the restore, i know how frustrating it is that was 9 months ago!


as for keeping the rust away, i just used a wire wheel on an angle grinder
as it give much better speed and performance than a wire wheel on a drill. then
use a rust treatment and zinc primer, then etch primer over that, works really
well, i had some parts of mine coated for months with just zinc primer and its
was spot on not rust coming back to anything.


I'm going to be using my black plasticare tonight for the first time, lol I like
the improvement on yours, hoping for the same.

Edited by NFS

Share this post


Link to post
Share on other sites
calvinhorse

I see what you mean by one thing leading to another :D


Car looks lovely!

Share this post


Link to post
Share on other sites
Kane

Thanks very much!


Yeah I've got myself kitted out with a lot of new equipment including grinder with various attachments so that should do the trick. Thanks for the advice.


It is amazing the results it produces, best way for applying I found was to clean down with thinners/panel wipe then get a clean dry sponge and go wild. It did take a few coats as it was going from light grey to black but even with that I still have about a third of a bottle left.

Share this post


Link to post
Share on other sites
Kane

Quick update,


Got round to removing the remaining bits and pieces from the bay the other day and as you can see I'm pretty much ready to start the prepping for rust removal.


fullystrippedenginebay_zps8a7ff68d.jpg


fullystrippedenginebayfront_zps36687ea7.jpg


Funny thing, since taking the car apart I have found quite a few loose wires several of which were not connected at either end. I thought it was a little strange as the car doesn't look as though it has had any modifications to it. Probably nothing serious to worry about but I'm sure I'll find out soon enough when its built back up.


Since the weather is terrible at the moment meaning I can't get out to the car I have been reading up some threads on the forum. After reading this>>


http://forum.205gtidrivers.com/index.php?showtopic=148413


I think I am going to have a bash at making up my own loom as the one I got with the car is in a bit of a state. Queue some more ebay purchases..


One thing - I have read that some people recommend moving the relays from the engine bay to inside the car, would these be better suited under the steering column next to the ecu or somewhere under/around the glove box.


Cheers


Kane

Share this post


Link to post
Share on other sites
Slo

I would reccomend leave them where they are but get yourself one of those underbonnet plastic relay housings failing that next to the ecu worked for me as theres quite a bit of unsued room next to it whereas round the fusebox is a little busy

Share this post


Link to post
Share on other sites
Kane

Thanks Andy, I'll have a look into the housings and see what I can find.

Share this post


Link to post
Share on other sites
Kane

Spent a bit more time today removing bits and pieces from the front end of the car. As expected the bumper support bars in the wheel arches were severely corroded, so much so that when I tried to remove the nuts both bolts on the front bumper supports sheared. Luckily I have just seen that a member on here has started producing these as they are now nfp from Peugeot, good timing I guess.


brokenbumpersupports_zps087fc86d.jpg


Looks like I will definitely have to replace the two bars located on in the wheel arches although I think the front bars can be saved. I will just have to drill out and weld in some new bolts once they have been cleaned up.


In keeping in tune with the original title one thing has certainly led to another! I'll let a photo do the explaining>>


Frontend_zps9a40f284.jpg


I decided that some of the lower areas of the engine bay were going to be too difficult to get at with the subframe in place so I dropped it and pulled it from under the car. Now with that out of the way I can hopefully make a start at removing all paint/underseal from the bay and wheel arches. Unfortunately this may be a few weeks before I get round to doing so as I am in the middle of another project restoring an old mini clubman but I will update as I go.


Thats all for now.


Kane

Share this post


Link to post
Share on other sites
chipstick


valvedamage_zps98ecca3e.jpg


O'RLY!


I can't help but see an owl.

Share this post


Link to post
Share on other sites
2052NV

ORLY+Wallpapers.png

Share this post


Link to post
Share on other sites
Kane

Managed to get out today and start preparing the engine bay for rust treatment. Had a go at using some strip disks on an angle grinder which went well although they didn't last at long at all. Then moved onto some sanding disks which also worked a little but I found it difficult to get right into the corners.


Luckily I managed to find an old tin of industrial paint stripper from when my old man owned a spray shop. This stuff is lethal! Brushed some on left it for a couple of minutes and the paint began to bubble, then with a light brush and a wipe it all started to come away. By the time I got round to cleaning up the first coat it was getting a little dark so am going to have a go again tomorrow.


I know not the greatest update but progress is progress I guess.


Here's a couple of shots from today.


2013-09-03201530_zpsc03fb5fd.jpg


2013-09-03205346_zps8acce953.jpg


Also has anyone had any experience using Jotamastic 87? I was reading up on it and seemed a good primer to use as a basecoat so went out and bought a tin. The thing is the spec sheet says it should be applied with an airless spray gun although the setup I have is compressor and air fed cup gun. I haven't had a look in the tin yet but from what I have read it is pretty thick so would have to be mixed with a lot of thinners to be usable. I found a topic HERE on the mig-welding forum where a guy has used a compressor and the results look good. Just wondered if anyone had done this before or could give me some advice on what to expect.


Kane

Share this post


Link to post
Share on other sites
Kane

Spent a few more hours at the car the past couple of nights. The weather is getting worse as the week goes on, not ideal when taking the car back to bare metal!


Managed to pop up the gazebo which works a treat for keeping out the rain. Thought I'd leave the sides off it for now while using the metastrip as I'm sure the fumes could have made for an interesting evening. Sorry about the quality of the photo's, my phone was the only thing I had to hand.


2013-09-06200549_zpsddf519da.jpg


And after a quick once over with some sand paper..


2013-09-06215357_zps284000c9.jpg


Had a quick look around and there is still a couple of areas which I need to go over with the metastrip then it will be on to a quick degrease and a lot of the bilthamber deox-gel. Plan is to have this done after work tomorrow night then hopefully get a few coats of jotun on Sunday before I head off on holiday next week.

Share this post


Link to post
Share on other sites
Kane

Got out to the car today and cleaned off all the deox-gel that I had applied last night, the first coating didn't seem to remove all the rust so put on some more. This gave me some time to collect my old man's compressor and get all the kit together that I would need to apply the primer.


After a quick clean down with some degreaser and a once over with some tac-rags I gave it a few coats. So it went from this>>


2013-09-08161701_zps2812fc92.jpg


To this>>


2013-09-08191219_zps7488e237.jpg


I'm quite pleased with the results I managed to achieve for my first attempt at spraying anything, oh and not to mention the bodged spray booth :P Those brake lines will also be getting replaced, I just haven't got round to disconnecting them yet.


Next on the to-do list is to seam seal everything in the engine bay with some polyurethane sealant and then once that is set apply a further 2-3 coats of jotun. Now I've started the painting I need to order up some top coat, can anyone recommend a paint supplier that deals 205 colours or is it readily available from any old paint shop?

Share this post


Link to post
Share on other sites
cybernck

Where has the tow hook eye gone?

Share this post


Link to post
Share on other sites
Kane

It's sitting in the garage at the moment. I've got a bottle of bilthamber deox-c so have still to put the towing eye, gearbox mount and a few other things in a tub to treat for rust. Then I'll get them painted up and refitted.

Share this post


Link to post
Share on other sites
johniban

looka good! was it hard to take the brake servo off?

Share this post


Link to post
Share on other sites
Kane

No not too difficult just a matter of removing several bolts under the steering column then pull. The only issue is trying to get the sound deadening foam off first

Share this post


Link to post
Share on other sites
Kane

So after a couple weeks off on holiday and then coming back with the flu I've managed to finally get a couple of hours out at the car. All primer, basecoat and topcoat is on just waiting for that to dry.


Next step is to strip the wheel arches and sections of underside that have begun to show rust.


Quick question, has anyone got advice on the best way to lift the front end of the car up high enough to make it easier to work on the underside? The front suspension, subframe, engine etc is still off so the front end is fairly light. I've got a 250kg winch so was thinking of using that to somehow raise the front end onto some fabricated tall axle stands.


Has anyone done something similar to this or has any other suggestions?


Kane

Share this post


Link to post
Share on other sites
Kane

Good news...


After a long couple of months all parts are finally finished at the machine shop and should be getting collected tomorrow! By the looks of it if I can source a few remaining rebuild parts and organise an engine stand the old pug might soon be able to move under its own steam again (touches wood...)


Received a big box of clean and strip disks the other day so plan for the weekend is to get the undercarriage cleaned up, painted and then put back the fuel tank, exhaust etc. Will upload some pictures when its done.

Share this post


Link to post
Share on other sites
Kane

Finished up tonight de-rusting and painting the boot floor and underside of the rear of the car, only managed to get a pic of the boot though as it was getting a bit dark so will upload the finished underside in a few days.


Here is the boot floor before>>


20131012_093812_zps169424ce.jpg


and after (ignore the leftover carpet/glue on the inner wheel arch that has still to be cleaned up)


20131017_164412_zps1d5baac1.jpg


Ended up having to cut out a section of the floor as there was quite a bit of rust. This allowed me to have my first go at welding on the car which was an experience :blink: Ended up turning out not too bad and after a few coats of paint you can barely notice it :)


Oh and here's some nice shiney pics of the parts I've received back from the machinist


20131017_175458_zps726b1f97.jpg


20131017_175703_zps61d7c616.jpg


20131017_180519_zpsc04e3668.jpg

Share this post


Link to post
Share on other sites
Kane

Finished stripping back and painting the boot floor inside and out last weekend and managed to paint the rear aches this weekend despite the sh*t weather. Here's a few pics.


20131026_093009_zps0d9587a7.jpg


20131026_145241_zps31d42b53.jpg


20131026_145252_zpsb1806423.jpg


The wet weather forced the progress outside to a halt but it gave me the opportunity to spend a few hours painting engine parts in the garage. Here's a quick snap of the gearbox mid clean and after a lick of paint, I have to say it was an absolute PITA trying to get 20 years worth of crud off the gearbox!


20130909_172559_zps3e5c4692.jpg


20131027_122348_zps520a733d.jpg

I forgot to get pics of the block/head/rocker cover etc but will upload at some point soon, the colour scheme in the bay is going to be matt black and aluminium.


Job for next week is to source the final parts for the engine rebuild, fingers crossed everything will be here before next weekend so I can make a start when I have a bit of time off.

Edited by Kane

Share this post


Link to post
Share on other sites
Keaton

Hi, what did you use on the underneath of the floor.. It seems to be a huge minefield out there with yo many different opinions.


I was thinking of kurust, zink primer, Shultz with a red top coat.


Please advise would this work.


Also good job your doing.


Cheers

Share this post


Link to post
Share on other sites
Kane

@Keaton


I would say clean back as much as you can with wire wheel and grinder or similar then apply a thick layer of bilthamber deox gel


The deox gel is good as it actually removes the rust completely but it does take a bit of work. What you have to do is apply a thick coat over the rust affected area and cover with something like cling film to prevent drying out. Leave for up to 24 hours and then go back and attack it with a stiff brush or even the wire wheel again. Wash off product with plain water and dry, be sure it is clean! You should be left with clean steel (i.e. no dark rust, maybe some pitting), if there is still some rust showing then repeat the process until clean.


It is a bit of a PITA job as it takes a while but the results are great!


I would say if your undercarriage is in the same state as mine then the chances of getting rid of all the rust using deox gel is not likely so the next thing to do is to get a rust convertor. Something like bilthamber hydrate 80, kurust or similar would work. Apply as per instructions then move onto paint.


I used jotamastic 87 which is an epoxy mastic primer used in professional marine applications. This stuff comes highly rated from a number of other sources but I can't comment yet obviously as I've only recently applied it. I think it comes in three different colours also (off white, grey and black). It goes on really well with a brush or roller and I even thinned it down and used it in a cup gun for my engine bay. When it dries it is extremely flexible, almost like rubber (I know because I let a small bit go off in a tub and checked it after) so it should fair quite well against stones and the like.


Finally I would say 2k top coat of choice should finish the job off nicely.


Hope this helps.


OK so my updates have been non existent lately due to me being bust with other things but am off to the motor factors first thing in the morning to collect the last remaining items required for the engine rebuild so I should hopefully be able to make a start with that tomorrow (fingers crossed).


Updates to come soon.


Kane

  • Like 1

Share this post


Link to post
Share on other sites
Keaton

Thanks for the advise mate.


Currently welding it up at the moment and then going to tackle the underside.


Wish me luck as I know it's not the nicest of jobs.


Thanks again.

Share this post


Link to post
Share on other sites

Please sign in to comment

You will be able to leave a comment after signing in


Sign In Now
Sign in to follow this  

×