Jump to content
  • Welcome to 205GTIDrivers.com!

    Hello dear visitor! Feel free to browse but we invite you to register completely free of charge in order to enjoy the full functionality of the website.

thirdtimelucky

[car_upgrade] 205 Gets An Extra 2 Cylinders

Recommended Posts

thirdtimelucky

Ok, about time I got this project done, it's been sitting at the back of my workshop for a year feeling sorry for it's self since I got a new job that seems to take up all my free time. I’ve got a couple of weeks off over Christmas so I should be able to put a few hours into making some progress. The plan is to get it built and painted by June so I can have some fun in it before I sell it to fund another project.


The first job is going to be the clutch operation, the v6 is hydraulic and the 205 is cable. Most of the v6 conversions use a combination of the 2, using a leaver system. I have done away with the hydraulics all together which works fine but a little heavy in operation and it looks a bit out of place and non original. I’m looking at making the whole system hydraulic, I’ll have a play with some ideas and get some photos posted.


Pic of my redesigned engine.

mount2-1.jpg

Share this post


Link to post
Share on other sites
Rob Turbo

If you want to go completely hydraulic then a simple-ish way is the way I did my first 306 v6, cut a hole in the bulk head in front of the clutch peddle just below the pivot and weld a thick ish plate with a square hole in like on the 406 v6 (I cut the 406 pedal box up to get mine), then you can fit the complete 406 system, just pull the plastic clip off the end of the master cylinder, cut a thread on the end (M6 IIRC), fit a rose joint, then drill the clutch pedal for a bolt to fasten the rose joint to.


I came to the conclusion that the problems I had were due to moisture in the hydraulic fluid which I couldn't change because the standard D8 clutch setup doesn't have a bleed nipple, so if you go for the later D9 setup which does have a bleed nipple you should be able so sort any problems like that!

Share this post


Link to post
Share on other sites
thirdtimelucky

Finely got around to doing some work on this over the weekend, after it sitting dormant for the last 18 months. I want it done ready for pugfest this year.


I got to work on converting the 205 pedal box to accept a hydraulic clutch master cylinder from a 206. I’ve got a 206 gti I’m breaking so could take some measurements from it. The 206 pedal was the same length as the 205 one so it was easer to work out the pivot points and where to connect the master cylinder. I decided not to connect the cylinder to the pedal but to weld an angled plate to the other end of the pivot tube, this allowed more room for the brake pedal and will give me more clearance for the timing belt cover. I had to shorten the actuating rod as in the 206 the pedal is further away from the pedal, I cut it and ran an M8 die down it and wound on a M8 rod end so I could make small adjustments in its length for fine tuning.

Ill clean up some welds and the grinding marks and paint it along with the servo next week end. It should look fairly original and neater than a cable/hydraulic conversion box.


HydroClutch4.jpg

HydroClutch.jpg

HydroClutch1.jpg

HydroClutch2.jpg

HydroClutch3.jpg

Share this post


Link to post
Share on other sites
welshpug

yay! :lol:


servo's on upside down btw ;)

Share this post


Link to post
Share on other sites
kate205gti

look forward to seeing it at pugfest ;)

Share this post


Link to post
Share on other sites
thirdtimelucky
yay! :(


servo's on upside down btw :D


I haven’t achieved much since you were over last, Ill get back to the wiring in the next couple of weeks ( expect a pm full of questions ;) )


Having the the servo upside down keeps the vacuum pipe short and neat as the connection on the inlet manifold is close to the bulkhead. worth pointing out though as once the engine is in place the servo isn't going any where.


look forward to seeing it at pugfest :D


It might tempt you to go v6 :) Best get training ready for tug of war, we need to hold on to that winning title :lol:

Share this post


Link to post
Share on other sites
Alastairh
We need to hold on to that winning title ;)


I still have my medal! :lol:

Share this post


Link to post
Share on other sites
welshpug

ahh I was wondering about that, keeps it nice and hidden ;)


No probs about the wiring, though its been a while now! Will have to drag George down for a day or to maybe :lol:

Share this post


Link to post
Share on other sites
Rob Turbo

The wiring is fairly straight forward, I spent ages doing the wiring on my first v6 conversion, turned out the problem was a locked ecu, twice!! The second time around it only took about 5 mins to fit the loom and fire it up, then a while longer to make it all neat and connect the rest of the wires, and KNOWING that you have an unlocked ecu should mean it's plain sailing!!


That's more or less how I did my clutch the first time round, apart from I used all 406 coupe bits and I connected it straight to the pedal rather than making a seperate bracket, but the system not being bleedable caused lots of problems, you are obviously going to be able to bleed your setup so should make for a good tidy setup.

Share this post


Link to post
Share on other sites
marksorrento205

As said the wiring is easy. I have just dug all the wiring info out for James so I can pm it to you if it helps. Well impressed with the clutch pedal idea. It was what I was trying do but I was always trying to go straight onto the pedal and the servo was always the issue. Top work Paul!

Share this post


Link to post
Share on other sites
welshpug

Most of the wiring is already done to a certain extent, I buzzed it all out when I visited with Goliath some time ago and made notes, would be a case of deciding where the ecu is going and mating the loom to the 205.

Share this post


Link to post
Share on other sites
james_pug

good work paul its good to see some progress. clutch looks like it will be very neat. ive got the wiring info mark sent me in a pm still if you want me to foward it on?

Share this post


Link to post
Share on other sites
marksorrento205
would be a case of deciding where the ecu is going and mating the loom to the 205.


This is where I mount them :)


th_21012010955.jpg

Share this post


Link to post
Share on other sites
thirdtimelucky

Got my modified pedal box in, looks nice and standard even managed to reshape the 206 pipework to fit.


IMAG0145.jpg


Engine is back in with one of my new mounts. I angled up the servo with a couple of washers to give the master cylinder a bit more room. next job is make an adapter to fit a landrover clutch slave cylinder then the wiring and exhaust.


IMAG0149.jpg


IMAG0148.jpg


IMAG0150.jpg

Share this post


Link to post
Share on other sites
welshpug

looking good :)


Just been swapping an engine on a 405, looking at the shape of the subframe I doubt there's be much modifying required at all ^_^

Share this post


Link to post
Share on other sites
marksorrento205

Is there no way you can connect the 206 gti parts to a later std 406 slave cylinder with the bleed nipple? The landrover one works ok but it could be better imo.

Share this post


Link to post
Share on other sites
thirdtimelucky

looking good :)


Just been swapping an engine on a 405, looking at the shape of the subframe I doubt there's be much modifying required at all ^_^


Would be good to see it in a 405, should fit the engine bay a bit better. Would make nice every day cruiser, might have to run it on lpg the way fuel prices are going.


Is there no way you can connect the 206 gti parts to a later std 406 slave cylinder with the bleed nipple? The landrover one works ok but it could be better imo.


Thanks Mark, I fogot the later one wasnt a sealed system. If the 206 fitting fits it will be good. I'll do some homework.

Share this post


Link to post
Share on other sites
marksorrento205

I am waiting for some parts to try myself. Would be nice if its a direct fit!

Share this post


Link to post
Share on other sites
thirdtimelucky

I made some progress this week. Started with my torsion beam, the one on there was a 309 one I modified the beam for my 4wd and had been chopped about a bit too much. I wanted to stay with the wide track of the 309 but couldn’t find one for a sensible price so settled for a 1.9 205 one with callipers for £50. Me being me on the way home I thought I would just lengthen the tube so I could use the 309 ARB and torsion bars so when I got back to the workshop that’s what I did. Once I had striped and lengthened it I sent all the parts off for shock blasting, well worth the £30 when it comes back rust and dirt free ready for paint.

Beamshock.jpg


Assembled and fitted, just need to set the height and fit the brakes.

Finishedbeam1.jpg

Finishedbeam2.jpg


I got a second hand, late type 406 v6 clutch slave cylinder with a bleed nipple after Marks suggestion. A new one was £55 and I didn’t know if it would work. It came with the pipe work which had the same fitting as the 206. The pipe that goes into the slave cylinder is 4mm (3/16) so can be cut and any standard fitting fitted, makes it nice and easy to sort out the pipe work.

I came across a problem when I went to fit it to the gearbox, the engine and box I’m using is one I found before Christmas with low mileage that I used to replace the higher mileage one that I started with. I didn’t split the box on this one after the trouble I had with the release bearing on the last one only problem is the last owner must have because the release fork was the wrong side of the bearing, so engine and box out I thought I’d have a look at the clutch, lucky I did because the friction material was down to the rivets and heat damage. So £200 later I had one of these.

V6clutch.jpg


I put it all back together and this time the slave cylinder made contact with the release fork. Made up the pipe work and after a few attempts bleed the system. It all seems to work, pedal feels good and no leeks. I wont know it works for sure until I get the engine started.

Clutchpipe.jpg

Slavefitted.jpg


Going to get stuck into the wiring and mounting the rad over the next week. I’ve gone with the v6 rad to help with cooling, it’s a bit on the large size but I’ll give it a go.

Share this post


Link to post
Share on other sites
thirdtimelucky

Not had the chance to update for a while but made lots of progress, so much so it passed its mot today with no advisory's. Ill post more detail with photos tomorrow but so far I'm happy with it. I'm going to run it for a couple of weeks to iron out any teething problems and then give it a respray ready for pugfest. It sounds like It has a knackered cv joint, I think I have a spare so I'll swap it in the morning then take it out for a good run. I need to get the rev counter working as well, if anyone has a circuit diagram to get it working it would be appreciated; save me some time trying to work it out.

Share this post


Link to post
Share on other sites
Daviewonder

Any finished pictures? :unsure:

Share this post


Link to post
Share on other sites
thirdtimelucky

Ill take some detailed photos on the weekend, just an update on where it stands now starting with the radiator, I looked at using the v6 rad but there just wasn't the room so used the 205 one. I made a new lower slam panel to allow me to lower the rad and give the alternator some clearance, I'll paint it when I do the body work.


IMAG0225.jpg


Plumbing in the rad was easy, most of the pipe work was a combination of the v6 and the 205 I brought a 32mm u bend and had the stainless pipe left over from another project the rest of the cooling was set up as the 205 was. I fitted two 10" slimline fans and used the standard 205 rad switch to keep it simple.


IMAG0226.jpg


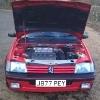
Next job was the wiring, I started by pulling the v6 ecu loom apart and cut out all the wires I didn't need, made a bracket and mounted the ecu by the servo as Mark suggested, its a bit tight but looks neat. I ran all the wiring through convoluted tubing to keep it neat and ran it through the bulk head next to the lighting loom rather than where the 205 one goes which is very close to the rear exhaust manifold. Linking the loom into the 205 loom was very easy really a permanent live to the ecu a few switched lives to run the relays and the only connections to the 205 where the oil and water sensors, reverse switch, alternator, starter and rev counter. I used a new pair of plugs, they were only a couple of quid from vwp and its neater than joining wires. No photos yet as I forgot at the time.


I connected the fuel lines and after a bit of cranking she fired up, apart from the tappets rattling a bit until they filled with oil all seemed good so spent the next couple of days getting it ready for its mot. It passed with no advises so I've spent the last couple of days scaring my self, It runs really well and is a pleasure to drive and goes like the clappers Its been a bit wet so been having trouble with traction in, first is just useless in the wet and it will keep spinning right through into third. The plan is to run it for a couple of weeks and sort out any teething problems and get all the mechanical part spot on then I've talked a friend into letting me borrow his spray booth for a weekend in early July so I can respray it.


At some point I will make a v6 conversion guide and get input from those that have already do it, its not as strait forward as the gti6 or mi conversions but if your handy with a grinder and welder it costs about the same and makes a very interesting road car.


IMAG0227.jpg

IMAG0231.jpg

IMAG0235.jpg

IMAG0236.jpg

IMAG0242.jpg

IMAG0240.jpg

IMAG0241.jpg

Share this post


Link to post
Share on other sites
Anthony

I like that - looks like you've done an excellent job of the whole install and conversion, and somehow managed to make it look simple and uncluttered! :)


How little sump and downpipe clearance have you got with the front of the car running that low though?

Share this post


Link to post
Share on other sites
Daviewonder

Awesome!

Share this post


Link to post
Share on other sites
omega

that looks so neat well done

il look forward to your idoits guide

Share this post


Link to post
Share on other sites

Please sign in to comment

You will be able to leave a comment after signing in


Sign In Now

×