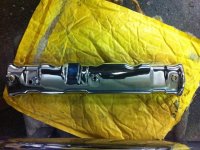
I found a rocker cover that pug_ham had spare which was sent to me and was asked if i could do a little how to guide on polishing alloy.
Upon opening the parcel i was greeted by this nice little 8v rocker cover, looking a little sorry for itself

So the work started, first thing was to strip all the dirt and top corrosion off to see what the condition of the alloy was in under all of it, I used a used Scotchbrite mop.

a few runs over it to bring it all up and this is how it looks


There was some pretty bad pitting and a few deep gauges, also the date stamp that would be better if removed...... so, out comes the sander, starting off with some 180 grit to take out most the marks and then 240 and onto some 320. I don't really go much finer as the machine does most the work, but if your polishing something using a drill then its best to try get it as smooth as you can, will also save you some time...

so all sanded up and ready to hit the polisher,
1st mop is a hard sisal and the choice of soap is the grey, the grey has a good cut with little shine factor

the aim with this mop is to remove all the pitting and scratches out, use the soap little and often, too much soap is a waste and clogs your mops up and too little and you wont be cutting into the alloy, apply a good bit if pressure against the mop and polish in a fiew different directions to avoid making ripples in the alloy

once you are happy with the result and have removed all the imperfections in the alloy its time to move onto the next mop, clean all the old soap off as to not contaminate the next mop. different mops, different soaps ![]()
so up next is the white stitch mop and green soap, the mop is a softer material but still firm ( i sometimes use a colour stitch mop if theres a fiew light scratches left in the alloy ) the green soap is a slightly finer cut and also has a higher shine factor to it than the grey

remember, little and often and keep it moving in different directions, put a little pressure on the wheel, not as much as the hard sisal tho and you should start noticing a little bit of a shine coming up ![]()

clean the old soap off, and then we go onto the next mop, sooo... for this stage i use a calico loose fold mop and a blue soap, the mops a lot softer and the soap is a lower cutting and a higher shine to the green.

with this mop before i apply the soap i hold a wire brush against it for a fiew seconds to remove any old soap that has been left on it and to fluff the wheel up a little, ( you can also do this to the white stitch mop ) little and often again, and keep it moving in different directions, little pressure really is needed for this mop as all your doing is taking out the very fine scratches from the previous mop and bringing the shine up

and the finished result.........not bad ![]() ..............but whilst looking for a new supplier i found out there was a different soap that was available and none of the polishing shops i have ordered from have stocked, one that had a lower cut and a higher shine factor to it
..............but whilst looking for a new supplier i found out there was a different soap that was available and none of the polishing shops i have ordered from have stocked, one that had a lower cut and a higher shine factor to it ![]() but then upon ordering it i noticed that they had just brought out another soap, with a cut factor of 1 and a shine factor of 10
but then upon ordering it i noticed that they had just brought out another soap, with a cut factor of 1 and a shine factor of 10 ![]() soooo thought i best have a bar of that just to give that extra bit of sparkle
soooo thought i best have a bar of that just to give that extra bit of sparkle ![]()
for the ultimate shine i used a g quality loose fold mop, simular to the calico but a little softer material along with the supershine soap. and the end result ![]()

and then cleaned off with a nice soft duster, and then apply a nice coating of wax...... i use poorboys products as there easy to use. go on nice and come off with little effort, the nattys wax smells of bubblegum aswell ![]() for wheels i use the wheel sealant, if you keep them well coated with wax/sealant then the polished product will stay like this for years, i also tell people not to laquer things once they have been polished as there alot easier to maintain and then you wont have the pain of having to strip all the laquer off if water gets under it and it starts to corrode.
for wheels i use the wheel sealant, if you keep them well coated with wax/sealant then the polished product will stay like this for years, i also tell people not to laquer things once they have been polished as there alot easier to maintain and then you wont have the pain of having to strip all the laquer off if water gets under it and it starts to corrode.

i hope that this has been useful and if theres anything you would like to know just get in touch and i would be happy to help ![]()
thanks.
Bim . ( 1 FAT PUG )
